GitHub, now the most popular code repository, has won the favor of many major companies and projects, such as jQuery and Twitter’s Bootstrap. To make projects easier to understand, introduction pages are a must — sometimes even full documentation sites are needed. GitHub thought of this and provides the GitHub Pages service, which can not only create project sites but also serve as a personal blog. GitHub Pages has several advantages:
- Lightweight blogging system with no fussy configuration
- Uses markup languages like Markdown
- No need to set up your own server
- Each site gets 300MB of space per GitHub’s limits
- Custom domain binding supported
Of course, it has its drawbacks:
- Uses the Jekyll templating system, essentially static page publishing — suitable for blogs and documentation
- Dynamic functionality is quite limited (no built-in comments, for instance, though workarounds exist)
- Git-based, requiring hands-on work unlike WordPress’s powerful admin panel
That’s the overview. For a personal blog, the goal is simply to express your work and thoughts in a clean, refreshing way — and GitHub Pages is what I consider the perfect solution for this purpose.
Purchasing and Binding a Custom Domain
While Godaddy once supported SOPA and plasters unprofessional photos on its homepage, it’s actually a decent domain registrar. The main reason I chose it is that it supports Alipay — not having a credit card can really be a pain sometimes. Purchasing a domain is straightforward — register, pick a domain, pay — anyone with online shopping experience can handle it, and coupon codes are everywhere. A word of caution about domain configuration: thanks to the Great Firewall, we need to take some extra steps. There were reports of Godaddy’s DNS servers being blocked, making domains inaccessible. This happened to my blog as well, forcing me to migrate DNS resolution to a more stable domestic provider. This migration poses no risk to your domain — ultimate control remains with Godaddy, and you can switch back anytime. I chose DNSPod — their product is well-made, user-friendly, and free (with premium features in paid tiers). After registering and logging in, it’s just three steps according to DNSPod (I’m inserting one extra):
- First, add domain records. See DNSPod’s help documentation: https://www.dnspod.cn/Support
- Under your own domain in DNSPod, add an A record pointing to GitHub Pages’ service IP: 207.97.227.245
- Change DNS servers at your registrar: Go to Godaddy and modify Nameservers to these two addresses. If you’re unsure where to make the change, see: How to use DNSPod with Godaddy-registered domains
f1g1ns1.dnspod.net
f1g1ns2.dnspod.net- Wait for DNS propagation
Configuring and Using GitHub
Git is the future of version management — I won’t rehash its advantages, as there’s plenty of material out there. I recommend this Git tutorial in Chinese. To use Git, you need to install the client. Git is most convenient on Linux. The Windows version can be downloaded here. For other systems, refer to the official Mac Git setup guide.
On Mac, you can install GitHub’s graphical client directly, then set up a Git environment and you’re good to go. In Mac, open Terminal:
1. Check SSH Key Settings
First, check for existing SSH keys on your computer:
$ cd ~/.sshIf you see “No such file or directory,” skip to step 3. Otherwise, continue.
2. Back Up and Remove Existing SSH Keys
Since key files already exist, back up the old data and delete them:
$ ls config id_rsa id_rsa.pub known_hosts
$ mkdir key_backup
$ cp id_rsa* key_backup
$ rm id_rsa*
3. Generate a New SSH Key
Enter the following command to generate new key files. We just need the default settings, so press Enter when prompted for a filename.
$ ssh-keygen -t rsa -C "youremail@example.com"
Generating public/private rsa key pair.
Enter file in which to save the key (/Users/your_user_directory/.ssh/id_rsa):
The system will then ask for a passphrase:
Enter passphrase (empty for no passphrase):<enter passphrase>
Enter same passphrase again:<enter passphrase again>
If you see the following screen, you’ve successfully set up your SSH key:

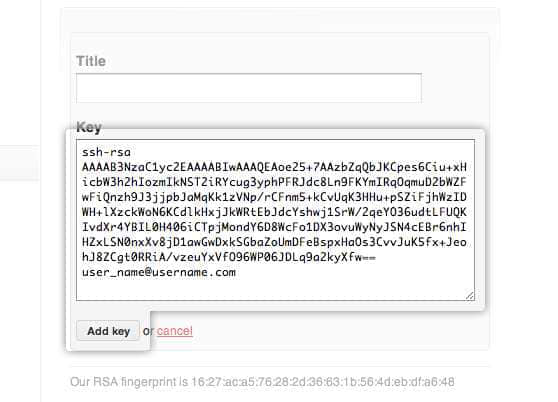
4. Add SSH Key to GitHub
After setting up the SSH key locally, add it to GitHub to complete the SSH connection setup. Open the id_rsa.pub file with a text editor (I recommend using vi). If you can’t see the file, enable hidden file display. Copy the contents precisely — accuracy is crucial for a successful setup. On GitHub’s main page, click Account Settings, select SSH Keys, paste the contents, and click Add Key:
For configuring multiple GitHub accounts, see Switching SSH Keys for Multiple GitHub Accounts. Note: if you only configure the Host as described in that article, commits across all accounts will show the same user. Use git config --global --unset user.email to clear the global setting, then use git config --local user.email 'your-github-email@mail.com' in each repo to set account info individually.
5. Test It
Enter the following command to verify the setup. Don’t modify the git@github.com part:
$ ssh -T git@github.comIf you see:
The authenticity of host 'github.com (207.97.227.239)' can't be established.
RSA key fingerprint is 16:27:ac:a5:76:28:2d:36:63:1b:56:4d:eb:df:a6:48.
Are you sure you want to continue connecting (yes/no)?
Type yes, and you should see:
Hi <em>username</em>! You've successfully authenticated, but GitHub does not provide shell access.6. Set Your Account Info
Now that you can connect to GitHub via SSH, there’s some personal information to configure. Git uses your name and email to record commits, and GitHub uses this info for permissions. Enter the following commands, replacing the name and email with your own. The name must be your real name, not your GitHub username.
$ git config --global user.name "Your Name"
$ git config --global user.email "your_email@youremail.com"
You’re now successfully connected to GitHub.
Building a Blog with GitHub Pages
With GitHub connected, you can take advantage of its Pages service. GitHub Pages comes in two flavors: User & Organization Pages (username.github.io) and project-specific pages.
User & Organization Pages
For a personal blog, use the first type — a site like username.github.io. Each user can only have one. After creation, click Admin to enter project management:
Regular projects look like this, even if you also use username.github.io:
After creating the username.github.io project, commit an index.html file and push to the master branch. The first deployment takes about 10 minutes to take effect. Once live, visit username.github.io to see your page. xiaowudesign.github.com was an example (I’ve since shut it down, so errors are expected).
For project pages, briefly: they use the same backend as user pages but are meant for project documentation and related content. You need to commit files to the project’s gh-pages branch, and GitHub will auto-generate the project pages. See the GitHub Pages official documentation for details.
Binding a Custom Domain
We covered the DNS setup in part one. On the GitHub side, to make username.github.io accessible via your own domain, create a file named CNAME in the project root with contents like:
imzl.com // Enter your domainYou can also bind to a subdomain:
blog.imzl.comImportant: if using a root domain like imzl.com, set an A record in DNS pointing to 207.97.227.245 (check here for current IPs) rather than a CNAME, as CNAME on root domains can affect other services (like email). After setup, allow up to 24 hours for DNS propagation.
Jekyll Basic Structure
Jekyll is essentially a text transformation engine. Write documents in your preferred markup language — Markdown, Textile, HTML, etc. — and Jekyll assembles them through layouts according to your URL rules, all defined in strict configuration files. The output is web pages.
Basic Jekyll structure:
|-- _config.yml
|-- _includes
|-- _layouts
|   |-- default.html
|   `-- post.html
|-- _posts
|   |-- 2007-10-29-why-every-programmer-should-play-nethack.textile
|   `-- 2009-04-26-barcamp-boston-4-roundup.textile
|-- _site
`-- index.html
A brief explanation of each:
- _config.yml
The configuration file that defines your desired behavior. Set it once and forget it.
- _includes
Store small reusable modules here, easily called via {% include file.ext %} (remove the spaces between { and %, same below). This command includes the _includes/file.ext file.
- _layouts
This is where template files live. Templates need YAML front matter definitions (covered later), and {{ content }} tags insert data into templates.
- _posts
Your dynamic content — typically your blog posts. Naming is strictly defined: 2012-02-22-article-title.MARKUP, where MARKUP is the file extension for your markup language. Based on link rules in _config.yml, you can flexibly adjust — the date and markup extension are independent of the article title.
- _site
Jekyll’s final generated output. Don’t worry about this. Best to add it to your .gitignore.
- Other folders
Create any folders or files you like in the root directory. For example, a project folder with github-pages.md inside is accessible at yoursite.com/project/github-pages (with a root domain). File extensions can be .html, .markdown, or .textile. More examples: https://github.com/mojombo/jekyll/wiki/Sites
Jekyll Configuration
Jekyll configuration goes in _config.yml. There are many options, but most don’t need attention. The official configuration docs cover everything in detail. I’ll focus on two important things: Permalink and custom variables.
Permalink defines your final article URL format, using these variables:
year— year from the filenamemonth— month from the filenameday— day from the filenametitle— title from the filenamecategories— the post’s categories (ignored if none)i-month— month without leading zeroi-day— day without leading zero
Example configurations:
permalink: pretty/2009/04/29/slap-chop/index.htmlpermalink: /:month-:day-:year/:title.html/04-29-2009/slap-chop.htmlpermalink: /blog/:year/:month/:day/:title/blog/2009/04/29/slap-chop/index.html
I use:
permalink: /:title/github-pages
For custom variables — if you define title: Len's Blog, you can reference it in posts as {{ site.title }}. Very handy for global variables.
YAML Front Matter and Template Variables
For posts using YAML-defined formatting, Jekyll treats them specially. The format must be exactly:
---
layout: post
title: Blogging Like a Hacker
---
The --- delimiters are required. Between them, define your variables. layout calls a template from _layouts. Other available variables include:
permalink— use a custom permanent link for a specific postpublished— individually set whether a post should be publishedcategory— set the post’s categorytags— set the post’s tags
The title above is custom content. You can set other values too and reference them via {{ page.title }} in the post.
For other template variables, see the official docs: https://github.com/mojombo/jekyll/wiki/template-data
Managing Comments with Disqus
The template setup is essentially complete, but Jekyll is just a static page publishing system. Generating a cool-looking site is easy enough — but what about comments? Also straightforward.
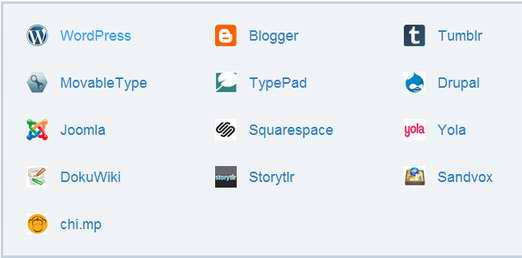
There are many dedicated comment module products: Disqus, and the Chinese alternative Duoshuo. Disqus has comprehensive support for current platforms. As of this writing, Duoshuo is still just a WordPress plugin, so I can’t use it here. Duoshuo’s tight integration with Chinese social networks is a highlight worth watching. I went with Disqus for now.
I’ll skip the registration. Disqus supports many blog platforms:
Select “Universal Code” at the bottom, then copy the following code into your template (you can limit it to the post template):
<div id="disqus_thread"></div>
<script type="text/javascript">
    /* * * CONFIGURATION VARIABLES: EDIT BEFORE PASTING INTO YOUR WEBPAGE * * */
    var disqus_shortname = 'example'; // required: replace example with your forum shortname

    /* * * DON'T EDIT BELOW THIS LINE * * */
    (function() {
        var dsq = document.createElement('script'); dsq.type = 'text/javascript'; dsq.async = true;
        dsq.src = 'http://' + disqus_shortname + '.disqus.com/embed.js';
        (document.getElementsByTagName('head')[0] || document.getElementsByTagName('body')[0]).appendChild(dsq);
    })();
</script>
<noscript>Please enable JavaScript to view the <a href="http://disqus.com/?ref_noscript">comments powered by Disqus.</a></noscript>
<a href="http://disqus.com" class="dsq-brlink">blog comments powered by <span class="logo-disqus">Disqus</span></a>
After configuration, you can add async loading for better performance. For example, I hide comments initially and load the Disqus module when users click “Show Comments.” The code is simple — feel free to reference my approach:
$('#disqus_container .comment').on('click',function(){
        $(this).html('Loading...');
        var disqus_shortname = 'lenchou';
        var that = this;
        BYB.includeScript('http://' + disqus_shortname + '.disqus.com/embed.js',function(){$(that).remove()}); // JS loader function
});
If you don’t like Disqus’s styling, override it with your own CSS based on its generated HTML structure. Disqus also provides per-page comment count APIs — see the help documentation.
Code Highlighting Plugins
For technical blogs, code highlighting is essential. Two options: DlHightLight and Google Code Prettify. DlHightLight supports fewer languages (JS, CSS, XML, HTML), while Google’s plugin supports virtually any language with custom language support, auto-detection, and line numbers.
Google’s plugin is also easy to use — just add prettyprint to the <pre> tag. So I chose Google Code Prettify.
Setting Up a Local Jekyll Environment
Here I’ll mainly cover the Mac OS X installation process. For other operating systems, see the official Jekyll installation guide.
Living behind the Great Firewall, it’s necessary to change the gem source for faster downloads:
sudo gem sources --remove http://rubygems.org/
sudo gem sources -a http://ruby.taobao.org/
Then install Jekyll via Gem:
$ gem install jekyllIf you get errors, try:
$ sudo gem install jekyllAt this step I kept getting Failed to build gem native extension. A likely cause is not having rvm installed. See the rvm installation guide, or run:
$ curl -L https://get.rvm.io | bash -s stable --rubyYou’ll also need a Markdown interpreter. Set markdown: rdiscount in your _config.yml:
$ gem install jekyll rdiscountIf all goes well, the local environment is ready. Navigate to your blog directory and run:
$ jekyll serve --watchNow visit localhost:4000 to preview. For more on Jekyll Bootstrap, check it out if you want to customize further.
I encountered two puzzling issues during this process. First, my blog.md files in the root directory worked perfectly on GitHub Pages (accessible at imzl.com/blog) but kept returning “not found” locally, even though the generated _site directory contained the correct blog.html. Only localhost:4000/blog.html worked. Environment differences are a pain.
Second, regarding category: per YAML syntax, you can define article categories in the header, including multi-category like category:[blog,rss]. Everything worked locally, but after pushing to GitHub, the categories couldn’t be read. Frustrating, but I found workarounds. Here’s another helpful article: Several Issues with Local Jekyll Debugging.
Conclusion
If you’ve followed this not-so-comprehensive tutorial and successfully built your own blog, congratulations! All that’s left is to maintain the passion and keep writing.
This article is adapted from @beiyuu